
Do you know you can create your own ERC20 token from an already existing smart contract on Etherscan? Firstly, smart contracts are open-source, permissionless, transparent, and trustless. This is what allows the Blockchain space to grow so fast because developers do not have to build from scratch. Therefore you can create and build your project from already existing codes.
Shiba-Inu is one of the most well-known ERC-20 tokens whose market cap is about $20 billion. They sort of marked themselves as the Dogecoin killer however it is quite different from Dogecoin. Dogecoin has its own native blockchain, it is a little different in terms of technology. Dogecoin is not a token that needs to rely on the Ethereum blockchain. On the other hand, Shiba-Inu is a token that lives on another blockchain: the Ethereum blockchain.
What we are going to do in this article is understand how their smart contract works, interact with the functions, deploy it and create our own token. You can pretty much do this with any other existing ERC-20 smart contract: go to CoinMarketCap to find the token smart contract address, click the address to open Etherscan, find the contract, copy-paste it, do your own changes (change the name, supply, etc) and deploy!
IMPORTANT: If this is your first time deploying a smart contract, you will need a few things before starting: 1) a Metamask wallet, 2) get gest Ether, 3) know some basics about Remix Ethereum. You can get all these details on the article below:
and by the way, this article below also has really useful information to learn how to properly create an Ethereum token:
Finally, if you want to learn about Smart Contracts in detail, check out this course.
Let’s find Shiba-Inu’s contract on Coinmarketcap
Search for Shiba-Inu on the website. You can copy Shiba-Inu’s deployed contract address as shown in the image below:
Once you click on the address, you will see the token details on Etherscan where you can see details of the token holders, the total supply created for the token, and even the contract code by selecting the “contract” tab. See below:
One of the ways to know how the contract works is to deploy it ourselves. All we have to do is copy the contract code from Etherscan and paste it on Remix where we can test the functions and modify them to create our own token.
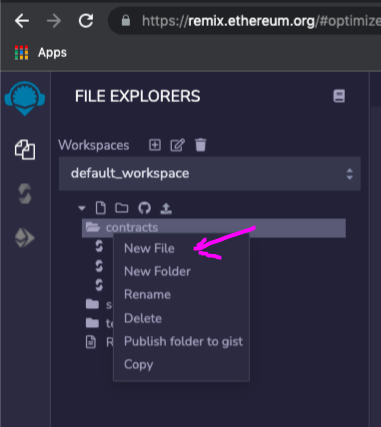
On Remix, create a new file and name it something.sol. Copy-paste the smart contract code to the new file.
Make sure the compiler version in the code is the same as in Remix Ethereum.
Next! We’re going to deploy our contract using the Rinkeby testnet (or any other testnet, really).
First off, You need to have a non-custodial wallet installed e.g metamask. Metamask is the gateway that holds users accounts and also allows us to explore blockchain applications in seconds.
Once metamask has been installed successfully, go to settings -> advanced -> show test networks. Here, you can find the Rinkeby network amidst others. Now, let’s fund our Rinkeby account. If you do not already have faucet(test) funds in your Rinkeby account, copy your Ethereum address and you can get faucet funds here.
By the way, if you wanna try the Kiln testnet (the Merge testnet), check this out:
Check your Rinkeby account on Metamask and Voila! you are 0.1 ether richer!
Okay! Back to business.
Now, let’s deploy or new ERC-20 Smart Contract
Let’s go back to Ethereum Remix where you have copy-pasted the smart contract code.
To deploy to the blockchain, we need to switch to “Injected web3”, and select the “TokenMintERC20Token” file which allows us to mint our own ERC20 token and deploy.
Here we see a list of functions to create our own token… you can edit these functions: you can name it whatever dog breed you like, the total supply, etc.:
Click transact. It will prompt your Metamask and you will have to click approve and pay the gas fees (in test Ether). Wait a few seconds and once approveeeeed…
We have minted our “dog” token and can now view the transactions on Etherscan. YAY! Congratulations! How simple was that?
Now that you have deployed the smart contract, you can use the left pane of Remix to see the functions and interact with the smart contract. Now let’s view each function and understand how they work:
- Approve(): This method gives access to a spender to spend an amount when called. It requires the spender’s address and amount.
- Transfer(): After approval of a token is done, then the token can be transferred/withdrawn by the spender.
- TransferFrom(): gives authority for a token to be spent on behalf of the token owner.
- Allowance(): The allowance function returns the token amount remaining. The spender is allowed to withdraw from the owner’s account.
- balanceOf(): This method gets the token’s current balance by taking the token address as a parameter.
- Decimals(): The unit set by the token owner
- isContract(): confirms the address of the contract
- name(): The name of the token.
- Symbol(): Shows token symbol as set in the code.
- TotalSupply(): The total supply of the token as set in the code.
Next article we will be deploying another Ethereum token by using OpenZeppelin. Subscribe to make sure you don’t miss it!
If you like to learn this kind of still, you should also take a look at this:
? Create NFTs, Tokens and DAOs — Smart Contracts Masterclass
? Metaverse Masterclass — Learn Everything about the Metaverse
